|
Saturday, July 28, 2012
Solid Rock of Australia


Sunday, July 8, 2012
Ganti Theme Wordpress, lagi
Diarsipkan dalam kategori: Wordpress Theme tanggal: 27 April 2010 oleh Mbah Dewo

Belum juga posting banyak setelah terakhir kali ganti theme dulu, sekarang saya sudah ganti theme lagi. Hanya bedanya, theme yang sekarang saya pakai ini adalah theme Wordpress buatan saya sendiri.
Dulu waktu pertama kali memutuskan untuk membuat theme sendiri ini karena waktu itu saya pakai sebuah theme yang tidak begitu lengkap kode-kode css maupun file .php-nya. Tidak usah saya sebutkan theme milik siapa (ndak sing nduwe ra trimo mergo theme-e tak unekke ora lengkap, turno yo paling ora mudeng bosoku iki mergane sing nduwe theme wong londo).
Dulu waktu pertama kali memutuskan untuk membuat theme sendiri ini karena waktu itu saya pakai sebuah theme yang tidak begitu lengkap kode-kode css maupun file .php-nya. Tidak usah saya sebutkan theme milik siapa (ndak sing nduwe ra trimo mergo theme-e tak unekke ora lengkap, turno yo paling ora mudeng bosoku iki mergane sing nduwe theme wong londo).
Dari theme tersebut saya ubah total baik ukuran, kode-kode di style dan halaman-halaman lain, dan saya tambahi file-file php nya juga. File tersebut saya comotkan dari theme default wordpress. Dari kejadian tersebut akhirnya saya malah jadi agak mudeng struktur theme wordpress itu seperti apa saja.
Dan setelah itu, saya pikir bahwa mending saya coba buat theme sendiri saja. Dan ternyata memang bisa. Walaupun harus googling ke sana sini, cari panduan membuat theme. Sampai boorkmark toolbar saya penuh, tiap ketemu yang panduannya bagus selalu saya boorkmark.
Selama beberapa minggu kemarin, hampir 1 bulan ini, saya ngutek-utek theme terus. Hingga saat ini sudah jadi 4 buah theme wordpress. Yang paling akhir saya buat adalah theme ini. Karena cuma memodifikasi theme wordpress buatan saya sebelumnya, maka theme yang saya pakai di blog Belajar Tutorial Photoshop ini saya buat agak cepat (sekitar 3 hari + tidak tidur 2 malam).
Tentang pengetahuan CSS ataupun HTML, saya blas nggak mudeng. Apalagi PHP (mbuh bangsane opo meneh kuwi), saya tahunya cuma PMP (itupun waktu sekolah dulu nilainya cuma pas-pasan).

Saya membuat theme ini cuma berdasarkan hapalan saja, karena seringnya ngedit theme Wordpress. Seperti yang pernah saya bahas beberapa malam kemarin sama teman saya si Dodok, bahwa saya membuat theme ini seperti halnya seorang tukang batu (tukang bangunan) yang tidak pernah sekolah arsitektur tapi bisa membangun rumah.
Saya sama sekali dulu nggak ngira kalau bisa membuat theme sendiri. Saya masih ingat dulu waktu awal-awal ngedit theme wordpress, waktu itu sering kali terjadi eror. Sudah mantep-mantep ngedit, setelah dilihat hasilnya ternyata sidebarnya hilang atau pindah kebawah alias mlotrok. Dan solusinya cuma pergi ke ruang sebelah di kantor Smile Group cabang Langensari … untuk mencari Isnaini. Dan biasanya penyebab eror adalah karena div -nya hilang satu.

Theme wordpress ini saya buat karena modal kebiasaan saja, bukan karena pintar desain web. Yang saya gunakan untuk membuat theme cuma dengan instalan Wordpress di localhost dan … notepad++. Tidak pakai Adobe Dreamweaver, karena belum ngistall. Pokoke serba manual dan dan modal hafalan. Kecuali kalau urusan gambar-gambar, jelas pakai Photoshop (karena memang software andalane yo mung kuwi).
Untuk melakukan sebuah perjalanan dengan cepat dan nyaman memang enaknya dengan mengendarai sepeda motor / mobil. Tapi kalau tidak bisa pakai motor / mobil, maka terpaksanya naik sandal jepit juga tetap bisa.
Beberapa theme Wordpress buatan saya akan saya publikasikan di blog ini juga, kalau ada yang senang silahkan di-download dan dipakai. Harap ditunggu dulu, karena saat ini theme-theme Wordpress tersebutmasih dalam tahap beta dan masih perlu dites lagi siapa tahu eror. Theme yang saya pakai di MbahDewo ini cuma saya pakai sendiri. Jadi sekalian saya buatkan 1 theme lagi, karena rencana saya akan ada 4 buah theme wordpress yang bisa di-download.
Theme ini belum saya coba di IE (Internet Explorer) versi 6. Biasanya walaupun di browser lain sudah bagus, di IE sering terlihat eror. Tapi biarin ajah, seperti yang pernah saya tulis juga dulu, salahnya sendiri masih pakai IE 6.
Memahami Layout Photoshop CS3
mempelajari ruang kerja adobe photoshop untuk mempermudah belajar tutorial photoshop. Untuk pemula yang baru mengenal atau baru mempelajari Adobe photoshop, ada baiknya mempelajari terlebih dahulu area utama yang terdapat didalam adobe photoshop, hal ini dimaksudkan agar nantinya kita tidak mengalami kesulitan dalam mempelajari Adobe photoshop lebih lanjut.
Layout Photoshop
Secara garis besar layout photoshop atau tampilan software adobe photoshop cs3 dapat kita bagi menjadi 5 bagian utama, yang mana kelima bagian utama inilah nantinya yang akan sering kita pergunakan untuk bekerja di lingkungan Photoshop.5 bagian utama di photoshop :

- Menu Bar
- Option Bar
- Tool Box
- Kumpulan Pallete
- Kanvas Kerja
Menu Bar
Disini saya mengambil contoh Layout Photoshop default dari Adobe Photoshop CS3. Walaupun saat ini Adobe Systems Incorporated telah meluncurkan versi CS5 yang kaya akan fitur serta kemudahan dalam mengolah gambar digital akan tetapi versi CS3 masih tetap menjadi favorite untuk sebagian pengguna Adobe Photoshop alasan nya karna Adobe Photoshop CS3 dapat bekerja maksimal pada komputer atau laptop yang tidak memiliki spesifikasi tinggi
di dalam menu bar terdapat 9 menu utama yang di dalam menu utama ini terdapat lagi sub-sub menu yang dikelompokkan berdasarkan fungsi dan kegunaan nya masing-masing, secara berurutan menu-menu utama dalam menu bar Adobe Photoshop CS3 adalah : File, Edit, Image, Layer, Select, Filter, View, Windows, dan Help.
9 Menu Utama dalam Menu Bar
Tiap-tiap Pallete yang tampil dalam Layout Photoshop dapat kita sesuaikan ukuran dari pallete tersebut, dapat pula kita hilangkan seandainya pallete tersebut jarang kita pergunakan, atau bila suatu saat kita perlukan kita pun dapat memunculkan nya kembali pada menu bar : View – Windows
di dalam menu bar terdapat 9 menu utama yang di dalam menu utama ini terdapat lagi sub-sub menu yang dikelompokkan berdasarkan fungsi dan kegunaan nya masing-masing, secara berurutan menu-menu utama dalam menu bar Adobe Photoshop CS3 adalah : File, Edit, Image, Layer, Select, Filter, View, Windows, dan Help.
9 Menu Utama dalam Menu Bar
- File
berisi sub menu untuk membuka, menutup, menyimpan dan bahkan export - Edit
Undo dan Redo adalah salah satu fungsi yang terdapat pada menu ini - Image
fungsi untuk kebutuhan editing gambar terdapat pada menu ini - Layer
menu untuk memanagement layer di dalam kanvas kerja Photoshop - Select
berisi fungsi-fungsi untuk mengatur seleksi - Filter
kumpulan sub menu di dalamnya digunakan untuk menciptakan efek-efek tertentu pada sebuah foto - View
Pengaturan kanvas kerja diatur pada menu view, baik itu zoom in, zoom out bahkan garis rulers - Windows
dipergunakan untuk menampilkan atau menyembunyikan Pallete dan komponen photoshop - Help
Dipergunakan untuk menampilakan bantuan penggunaan Adobe Photoshop
Option Bar
Secara Default letak atau posisi dari option Bar terdapat tepat dibawah Menu Bar Photoshop, opsi-opsi dari option bar ini akan selalu berubah-ubah sesuai dengan tool apa yang sedang kita gunakan, semisal pada saat kita mengaktifkan brush tool maka opsi pada option bar akan berisi pengaturan diameter dan ketebalan brush, kemudian kita juga dapat mengatur blending mode untuk brush, terdapat pula pilihan Opacity dan juga Flow, beda halnya saat kita mengaktifkan Crop Tool, maka option bar akan berisi berapa lebar serta panjang Crop yang akan kita lakukan, juga dapat pula kita input resolusi foto secara otomatis saat kita melakukan cropping. dibawah ini adalah contoh opsi dari option bar saat brush tool di aktifkan dan opsi yang tampil saat crop tool di aktifkan
Tool Box
Dalam bahasa yang sederhana Tool Box adalah sekumpulan alat-alat yang dipergunakan dalam mengolah gambar digital, dan masing-masing alat ini memiliki fungsi dan kegunaan yang berbeda-beda berdasarkan pengelompokannya. Tepat disebelah kiri dalam layout photoshopcs3 default akan kita lihat sekumpulan alat-alat yang nantinya akan kita pergunakan untuk kebutuhan pengolahan gambar, pada bagian atas dari tool box kita akan menemui kelompok alat yang dapat kita pergunakan untuk kebutuhan seleksi gambar, kemudian bagian selanjutnya tepat dibawah kelompok seleksi terdapat alat yang dapat kita pergunakan untuk melakukan cropping, lalu terdapat pula kumpulan alat untuk melakukan retouching, painting dan drawing, yang terakhir terdapat dibagian paling bawah dari tool box adalah alat-alat bantu yang menunjang kita dalam mengolah gambar.

Kumpulan Pallete Photoshop
Bilah sebelah kanan dari Layout Photoshop akan diisi oleh Pallete-Pallete yang telah di kelompokkan berdasarkan fungsi dan kegunaan nya, secara default bilah sebelah kanan dari ruang kerja dari Adobe Photoshop CS3 akan diisi oleh Pallete Navigator, Histogram dan Info pada bilah kedua terdapat pallete Color, Swatches, dan Style. kemudian bilah paling bawah terdapat Pallete Layers, Channel dan Paths.

Tiap-tiap Pallete yang tampil dalam Layout Photoshop dapat kita sesuaikan ukuran dari pallete tersebut, dapat pula kita hilangkan seandainya pallete tersebut jarang kita pergunakan, atau bila suatu saat kita perlukan kita pun dapat memunculkan nya kembali pada menu bar : View – Windows
Kanvas Kerja Photoshop
Di Area inilah tempat kita melakukan olah digital, semua pengetahuan kita tentang tool photoshop akan dapat kita pergunakan pada kanvas kerja, pallete-pallete photoshop yang telah sebelumnya kita pelajari akan sangat berguna saat kita telah mulai melakukan edit foto pada kanvas kerja, pallete layer akan selalu mejadi pendamping anda dalam bekerja di photoshop, begitupun dengan pallete history yang akan membuat kemudahan dalam kita mengorganisir langkah-langkah apa yang telah kita kerjakan pada kanvas kerja, untuk melakukan edit foto dengan cepat, pallete action wajib dipelajari lebih dalam.

Thursday, July 5, 2012
Calling web service using ASP.NET
Introduction
Web Services signal a new age of trivial distributed application development. While Web Services are not intended nor do they have the power to solve every distributed application problem, they are an easy way to create and consume services over the Internet. One of the design goals for Web Services is to allow companies and developers to share services with other companies in a simple way over the Internet.
Web services take Web applications to the next level.
Using Web services your application can publish its function or message to the rest of the world.
Web services use XML to code and decode your data and SOAP to transport it using open protocols.
With Web services your accounting departments Win 2k servers billing system can connect with your IT suppliers UNIX server.
Using Web services you can exchange data between different applications and different platforms.
With Microsoft .Net platform it is a simple task to create and consume Web Services. In this article am going to show how to call a published web services inside a web project.
I use a test published web services; Extentrix Web Services 2.0 Application Edition (http://www.extentrix.com/webservices/2.0.0/ExtentrixWebServicesForCPS.asmx) that Extentrix published for the developer community to help them in testing and developing.
So I’ll explain simply the functions of this web services APIs. In general Extentrix Web Services for Citrix Presentation Server helps you get information about a published application for a specific client with the specified details, server types, and client types. It also returns the ICA file description to be used to launch an application with a given parameter and checks the user's credentials and returns true if they are valid.
For more information, visit http://www.extentrix.com/Web%20Services/Index.htm
You can find more samples, use this web services, and test it onhttp://www.extentrix.com/Web%20Services/Test%20Drive.htm?id=6
Background
Knowledge in ASP.NET is preferred
Using the code
Simple Steps to consume web service:
- Create Web Site project
- Add web Reference
- Call the web services APIs inside the code
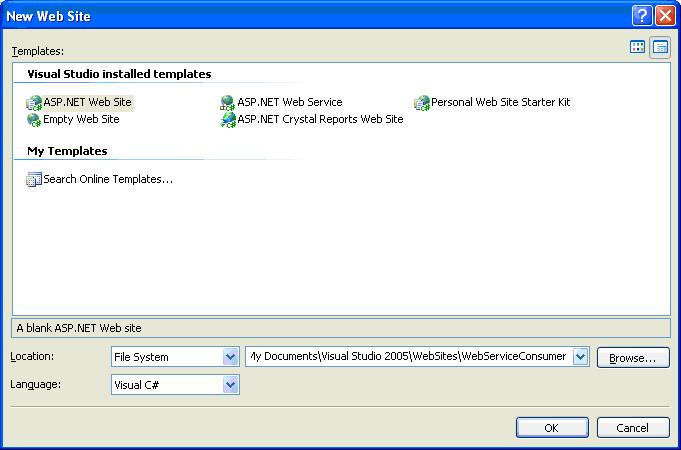
First Step: Create Web Site project
1. To create new Web Site project, choose New from File menu, then choose Web Site as shown below.
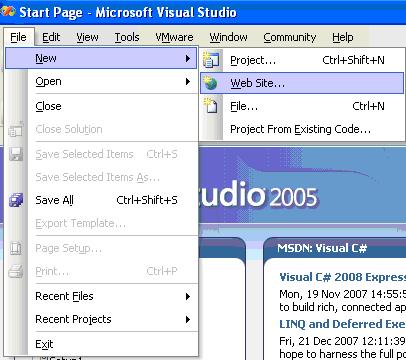
2. Choose ASP.NET Web Site. Name the project and click OK
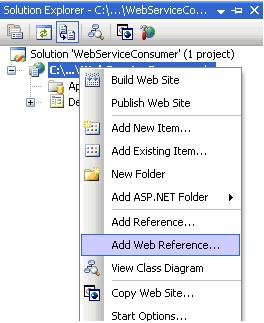
Second Step: Add web Reference
After creating the Web Site project, it’s time to add a web reference for our web service.
1. In the solution explorer, right click the project node, choose Add Web Reference
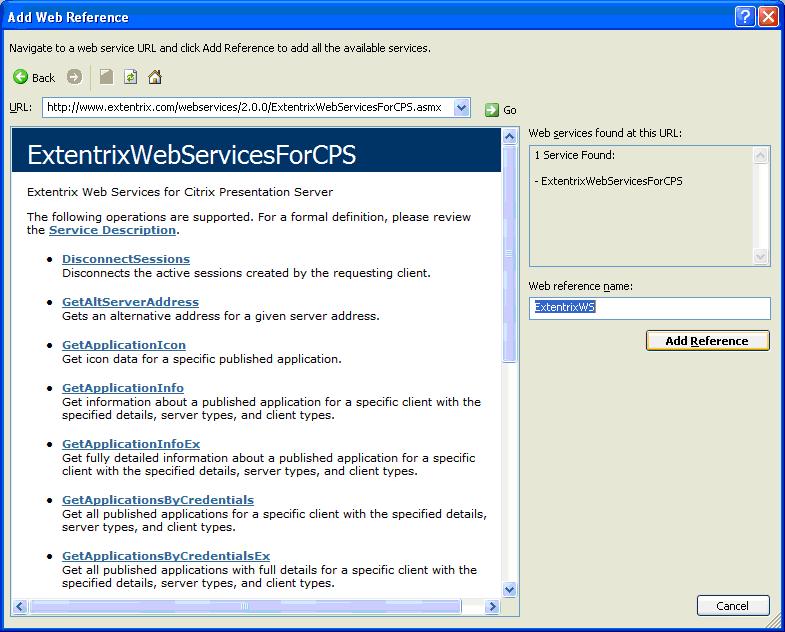
2. A new window with Add Web Reference title will be opened.
In the URL field, insert the URL for the web service. In this tutorial as I mentioned before I’ll use the test published web services form Extentrix. “Extentrix Web Services 2.0 – Application Edition”

After clicking the Go button you will see the web services APIs.
3. Set a name for your web service reference in the web reference name field and click Add Reference
Third Step: Call the web services APIs inside the code
After a successful adding to the web service, now we are ready to call the web services APIs inside our project.
1. First we need to add the added web reference to our class.
“ExtentrixWS” is the name of the added web service from the previous step.
using ExtentrixWS;
2. Create a proxy object for our added web service reference, where the ExtentrixWebServicesForCPS is the name of the Web Services
      //define a web service proxy object.
    private ExtentrixWS.ExtentrixWebServicesForCPS proxy;
3. As I explained before we need credentials to pass to Citrix Presentation Server, we will pass these credentials through the web services APIs
     //define a Citrix Presentation Server Credentials object
      private Credentials credentials;
Initialize the proxy and the credentials objects
    //intialaize objects
     proxy = new ExtentrixWebServicesForCPS();
     credentials = new Credentials();
4. Set the values for Citrix credentials. I set the credentials values for the test of Extentrix Web Service.
//set credentials
//these values are according to Citrix testdrive presentation server
//for which Extentrix published a web service for delovepers to use it
//as a test web service.
      credentials.Password = "demo";
      credentials.UserName = "citrixdesktop";
      credentials.Domain = "testdrive";


//because it is a sample,we will use no encryption method.
//so the password will be sent as a clear text.
      credentials.PasswordEncryptionMethod = 0;

//set the domain type to windows domain
      credentials.DomainType = 0;
Now we can call any web services available as simple as calling any ordinary function.
5. Call the GetApplicationsByCredentialsEx web service. This web service takes the following parameters:
- Credentials: Citrix Credential to access Citrix Presentation Server Farm.
- Client Name: pass your machine name
- Client IP: pass your machine IP
- Desired Details : what the details you asked for
- Server Types: pass “all”
- Client Types: pass “all”
Am not going to explain Extentrix web services APIs, if you are interested you can go tohttp://www.extentrix.com/Web%20Services/Index.htm and look for it.
This API returns an array of ApplicationItemEx, this class will be built for you once you add the web reference.
This class contains the published application properties. I used this web service to get all the published applications, and then I created an ImageButton for each application.
         // 1) Get all the published applications list by calling GetApplicationsByCredentialsEx web service.
         // 2) create an ImageButton for each application
         // 3) Create Image for the application
         // 4) Add it to the AppList panel.
         // 5) Set the event handler for each ImageButton, so when clicking it the associated application will run


         //calling the web service
          ApplicationItemEx[] items = proxy.GetApplicationsByCredentialsEx(credentials, Request.UserHostName,
         Request.UserHostAddress, new  string[] { "icon","icon-info"}, new string[]{ "all" },
         new string[] { "all"});

    //loop for each published application
    for (int i = 0; i < items.Length; i++) {
           //create the ImageButton
          System.Web.UI.WebControls.ImageButton app = new System.Web.UI.WebControls.ImageButton();


    //set the Image URL to the created image
           app.ImageUrl = createIcon(items[i].InternalName,items[i].Icon);


    //set the ToolTip to the name of the published application
           app.ToolTip = items[i].InternalName;


     //add the ImageButton to the AppList panel
           AppList.Controls.Add(app);


           //set the event handler for the ImageButton.
           app.Click += new
    System.Web.UI.ImageClickEventHandler(this.OnApplicationClicked);

            }
Finally another example in calling web service is to launch the published application.
In this example, in the event handler of the applications ImageButtons I launch the clicked application.
I get the ICA file content by calling LaunchApplication web service.
Then I write the ICA file content to the response to launch the application.
    private
        void OnApplicationClicked (object
        sender, System.EventArgs e)
    {
     ServicePointManager.Expect100Continue = false;

        // Get the event source object.
          System.Web.UI.WebControls.ImageButton app = (System.Web.UI.WebControls.ImageButton)sender;


        //Get the file ICAfile content by calling LaunchApplication web service.
        string ica = proxy.LaunchApplication(app.ToolTip, credentials, Request.UserHostName, Request.UserHostAddress);


        //Set the response content type to "application/x-ica" to run the file.
        Response.ContentType = "application/x-ica";


        //Run the application by writing the file content to the response.
            Response.BinaryWrite(Response.ContentEncoding.GetBytes(ica</place /></city />) );
     Response.End();
    }
SOAP Web Services: Create Once, Consume Everywhere
Introduction
This tutorial aims to provide a practical introduction to web services given their increased importance in software engineering. In short, web services offer clients the ability to remotely execute certain methods thus eliminating the need for downloading separate API. The communication medium between clients and servers is XML messages that comply with the SOAP protocol. The use of XML allows systems running different operating systems and programming languages to communicate by converting XML requests and responses into their corresponding language equivalents. Fortunately, programming languages like C# (or any .NET language), Java, PHP, etc. support both clients and servers with abstraction layers called proxies that eliminate the need to parse XML SOAP messages. In this tutorial, I'll show you how to create a Web Service in ASP.NET and how to register this service in IIS server 7.0; finally I'll demonstrate the language neutrality of web services by developing three client applications that consume this service in ASP.NET, Java, and PHP.
Creating the ASP.NET Web Service
Launch Visual Studio, and then go to File / New / Web Site...
Choose ASP.NET Web Service as the template and name your project: Server.
Throughout this project, I’ll use C:\Project7 as my default folder.

Go to the Service.cs file and create the four needed methods by replacing:
[WebMethod]
public string HelloWorld() {
return "Hello World";
with:
[[WebMethod]
    public int Add(int x, int y)
    {
        return x + y;
    }
    [WebMethod]
    public int Subtract(int x, int y)
    {
        return x - y;
    }
    [WebMethod]
    public int Multiply(int x, int y)
    {
        return x * y;
    }
    [WebMethod]
    public int Division(int x, int y)
    {
        return x / y;
    }
Note that
[WebMethod] tag allows the methods to be accessible to external clients. Now replace the code:[WebService(Namespace = "http://tempuri.org/")]
with:
[WebService(Namespace="http://tempuri.org/",
Description="A Simple Web Calculator Service",
Name="CalculatorWebService")]
The Description attribute gives external clients a brief description of the service; the Name attribute lets external clients refer to the service as
CalculatorWebService rather than Service.Installing the Web Service in IIS
This project uses IIS Server 7.0 running on a Windows 7 PC.
Activate IIS server by:
Start Menu / typing IIS in the search bar / Internet Information Services (IIS) Manager
or by: Control Panel / Administrative Tools / Internet Information Services (IIS) Manager
If you couldn’t find IIS, then probably it’s not installed, so consult Appendix A to know how you can activate this program under Windows 7.

Expand the tree Sites, then right click on Default Web Site, and choose Add Virtual Directory.
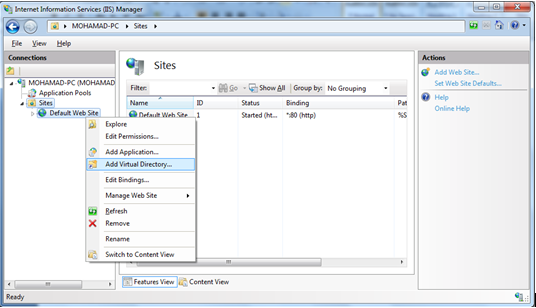
Enter WebService in the Alias field, and C:\Project7\Server in the Physical path field.

Click on the WebService folder and then switch IIS to Content View in order to see the Service.asmx and theweb.config files.

Since we’ve manually created the Virtual Directory WebService without the help of Visual Studio testing mode, you should right click the WebService folder and choose Convert to Application followed by clicking OK.

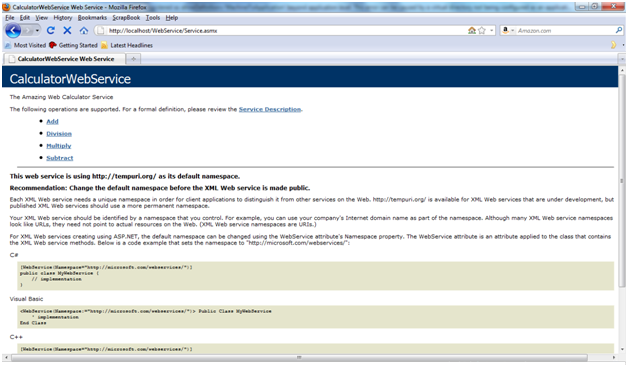
Now open your browser and goto http://localhost/WebService/Service.asmx, you should see a screen similar to this:
Note: If you didn’t see this screen, then probably IIS server isn’t configured properly, so consult Appendix B to learn how to configure IIS for the first time.
Testing the Web Service on the Server Side
On the CalculatorWebService page, you could see four links to the
Add, Division, Multiply, and Subtractmethods that we’ve implemented in C#; clicking on any of those links will take you to a new page where you could test your methods.

Creating the ASP.NET Web Client
Launch Visual Studio, and then go to File / New / Web Site...
Choose ASP.NET Web Site as the template and name your project Client.

Create an interface of your ASP.NET page similar to this:

Now let’s add our web service as a service reference to our project as follows:
Right Click the Project in the solution explorer / choose Add Service Reference / enterhttp://localhost/WebService/Service.asmx in the address field /click Go to view the imported functions / chooseServiceReference as your namespace / click OK.

Edit your Default.aspx.cs source to add the method
GetResult that takes as an input two number strings and an integer function which corresponds to the four basic calculator operations we need.private string GetResult(string firstNumber, string secondNumber, int function)
{
ServiceReference.CalculatorWebServiceSoapClient client =
            new ServiceReference.CalculatorWebServiceSoapClient();
int a, b;
string result = null;
erra.Text = "";
errb.Text = "";
if (!int.TryParse(firstNumber, out a))
{
erra.Text = "Must be a valid 32-bit integer!";
return "";
}
if (!int.TryParse(secondNumber, out b))
{
errb.Text = "Must be a valid 32-bit integer!";
return "";
}
try
{
switch (function)
{
case 0:
result = firstNumber + " + " + secondNumber +
" = " + client.Add(a, b);
break;
case 1:
result = firstNumber + " - " + secondNumber + " = "
+ client.Subtract(a, b);
break;
case 2:
result = firstNumber + " * " + secondNumber + " =
" + client.Multiply(a, b);
break;
case 3:
result = firstNumber + " / " +
secondNumber + " = " + client.Division(a, b);
break;
}
}
catch (Exception e)
{
LabelResult.ForeColor = System.Drawing.Color.Red;
result = "Cannot Divide by Zero!";
}
return result;
}
Note the statement:
ServiceReference.CalculatorWebServiceSoapClient client =
new ServiceReference.CalculatorWebServiceSoapClient();
which allows the client object to access the web service methods.
ServiceReference is the namespace of the web service you chose earlier. CalculatorWebServiceSoapClient establishes the SOAP connection with client (i.e. sends requests and receives responses in the form of SOAP XML messages between the proxy server and the proxy client).
Finally, add the Submit Button event handler with the following code to access the
GetResult method you created earlier.protected void btnSubmit_Click(object sender, EventArgs e)
{
LabelResult.ForeColor = System.Drawing.Color.Black;
LabelResult.Text = GetResult(TextBoxFirstNumber.Text,
TextBoxSecondNumber.Text,
DropDownList.SelectedIndex);
}
Installing the Web Client in IIS Server
Now you’re ready to make use of the web service with a small ASP web page that consumes this service.
Create a new Virtual Directory in IIS and choose WebClient as an Alias; and the folder C:\Project7\Client as a Physical Path.

And as you did for the WebService Virtual Directory, right click on the WebClient directory and choose Convert to Application followed by an OK.
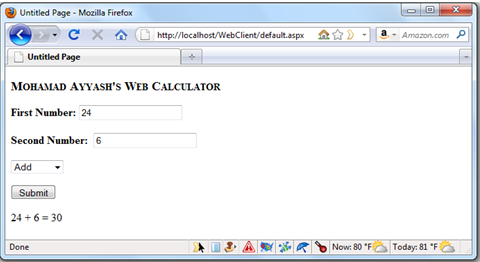
Finally go to the browser and type in http://localhost/WebClient/, you should see the figure below:

Testing the Web Service on the ASP.NET Client Side
Now that we’ve successfully installed the client page that makes use of our calculator web service, we still need to validate the client side results.
Installing and Testing the Web Client in a Java 1.6 Class
Regardless of whether we know the programming language that implements the web service or not, we can easily link applications of different platforms. Web services display to their clients standard XML pages called WSDL, which gives them an idea about what functions they implement. For instance, navigating tohttp://localhost/WebService/Service.asmx?wsdl would generate an XML page with special elements. The ability to read through the WSDL document and to locate elements like: type, message, portType, binding, service is very crucial, as it tells client developers about the functions hosted by the service (not a documentation). For more information about WSDL documents, visit www.w3schools.com/wsdl/wsdl_documents.asp.
Fortunately enough for JAVA 1.6 developers, is the existence of the JAVA jax-ws package that generates the proxy classes necessary for communicating with the web server.
First let’s build the java project in C:\Project7\java_proj\webClient.
So, start by creating a new java class called cl.java. (Make sure your current directory isC:\Project7\java_proj\webClient).
Now let’s run the jax-ws utility by typing the following in the command line:
C:\Project7\java_proj\webClient >wsimport -keep -p webPack.serv
http://localhost/Service.asmx?wsdl
The wsimport command will generate the proxy classes we need, -keep keeps the generated source files, andwebPack.serv is the package containing the proxy classes. You could see by examining the service section of the WSDL file and by browsing through the webPack\serv folders that you have the two main classes
CalculatorWebService and CalculatorWebServiceSoap.
Next, let’s edit our cl.java client as follows:
import webPack.serv.*;

public class cl
{
 public static void main(String[] args)
 {
  CalculatorWebService service = new CalculatorWebService ();
CalculatorWebServiceSoap soap = service.getPort(CalculatorWebServiceSoap.class);
  int x = 5,y = 10;
  System.out.println(soap.Add(x,y));

 }
}
The
getPort method returns the ‘stub’ of the CalculatorWebService class as defined by the web service and lets you access the four calculator methods defined. For instance, the soap.Add(int,int) method actually calls the server to perform the Add function defined there, and then directs the return value to the client.
Testing this class is easy; just compile as follows:
>javac –classpath . cl.java
Then run this program as follows:
> java cl
You’ll get "
15" as an output.Installing and Testing the Web Client in PHP
PHP allows the easy creation and consumption of SOAP based web services through the NuSOAP toolkit. To learn how to download and configure this API toolkit, visit http://sourceforge.net/projects/nusoap/.
First, you need to include the nusoap library so type in your PHP shell:
First, you need to include the nusoap library so type in your PHP shell:
require_once('nusoap.php');
Then you need to connect to our web service’s WSDL in order to generate the SOAP client, so type in:
$wsdl="http://localhost/WebService/Service.asmx?wsdl";
$client=new soapclient($wsdl, 'wsdl');
Now that the SOAP
$client is ready, we could then simply type in:$param=array(
'x'=>10,
'y'=>5
);
echo $client->call('add', $param);
And we’ll get ‘
15’ as expected.
Actually the way to access web services in PHP/NuSOAP is very similar to that in the .NET Framework.
Appendix A: Activating the IIS server and ASP.NET under Windows 7
In most Windows computers, IIS server and ASP.NET are not installed by default as they’re an optional Windows component; however, the installation process runs smoothly as follows.
Goto Control Panel and choose Programs and Features (you may need to click View by: Large Icons in order to see the Programs and Features icon).
On the left margin of the Programs and Features window, choose Turn Windows Features on or off you may need administrative privileges in order to proceed.

Next, expand the Internet Information Services tree to ensure the installation of IIS server. Then expand the World Wide Web Services tree and then expand the Application Development Features and make sure that the ASP.NETnode icon is checked.

Finally click OK to install the IIS and ASP.NET server.
Appendix B: Configuring the IIS Server for First Time Usage
To launch IIS server under Windows 7, go to the start menu and type IIS - you should see Internet Information Services (IIS) Manager.
First, you should start the IIS server, so click Start on the right margin labelled Action.

Now that the IIS server has started, you may (optionally) want to enable directory listing in order to permit users to browse the contents of your web server.
To do that, click on the Default Web Site tree in the left margin named Connections and then double click on theDirectory Browsing icon located in the middle of the screen. In the Actions, right margin click Enable.

You’re now ready to view your site. Just launch your browser and type http://localhost in your browser.
Subscribe to:
Posts (Atom)